A doctor blade is a narrow strip with a surprisingly important job: it helps control the ink left on an engraved surface before the next transfer. Understanding that job makes conversations about print quality much clearer. It also explains why a relatively small consumable deserves attention alongside the press, the ink, and the printing surface.
This introduction follows the ink through flexographic and gravure printing. It is written for readers learning the process, including production newcomers and people who buy printed packaging. It explains the relationships between components; it does not provide machine setup instructions.
Safety first: Keep observation separate from hands-on work. Only trained, authorized personnel should inspect or service printing equipment, following its manufacturer’s instructions and the site’s safety and energy-control procedures. Unexpected movement and stored energy can cause serious injury, as explained in OSHA’s hazardous-energy overview.
What the blade actually controls
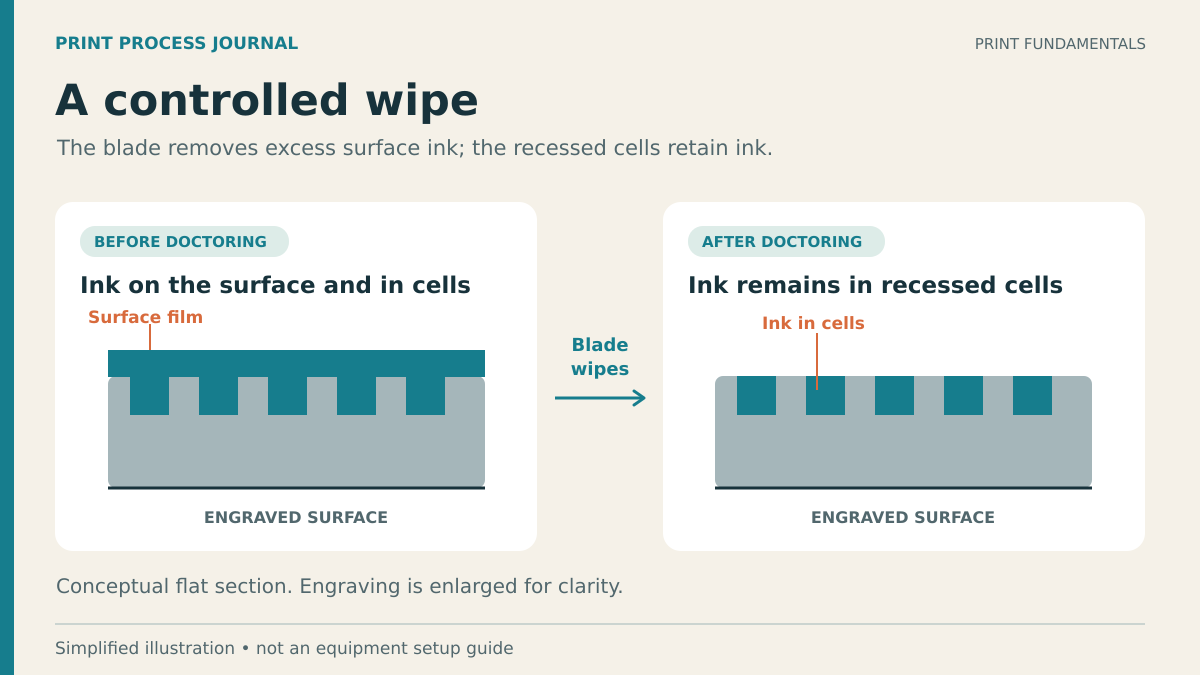
Imagine an engraved surface after it has received ink. There is ink inside its recessed cells, but also ink on the surrounding surface. The doctor blade removes the excess surface film so the engraved structure can perform its intended metering role. Allison Systems describes this function for both flexographic anilox rolls and gravure cylinders in its doctor-blade overview.
The important word is consistent. A useful production result is a controlled wipe that remains suitable as the job runs. Thinking only about the first acceptable impression misses the question of what happens later. Does the appearance remain stable? Does a recurring mark emerge? Does the operator need to intervene? Those are questions to record and investigate, rather than reasons to assume that every change originates at the blade.
In flexography, follow the ink to the plate
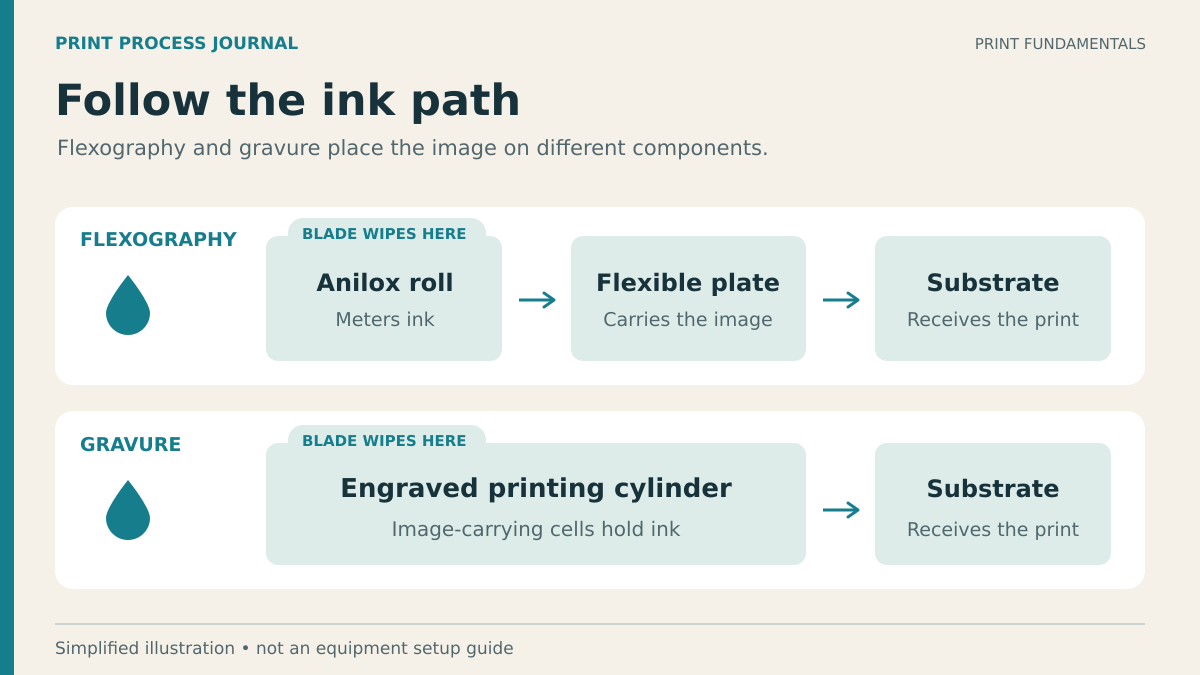
Flexographic printing uses a flexible printing plate to carry the image. An anilox roll meters ink for transfer to that plate, which then prints the substrate. In a doctor-bladed arrangement, the blade works against the anilox. Daetwyler SwissTec’s flexographic-printing guide emphasizes matching the blade to the anilox and the job, and maintaining a consistent wipe through the blade’s working life.
For a first explanation, it helps to assign each part one role: the anilox participates in ink delivery, the plate carries the image, and the substrate receives it. The doctor blade belongs in the ink-delivery part of that story. This simple map gives a new reader somewhere to place terms that otherwise arrive as a jumble of unfamiliar machine parts.
It also helps with questions. If a discussion concerns fine image detail, ask what is happening at the plate and on the printed sample. If it concerns inconsistent ink delivery, ask about the metering system and the recorded operating conditions. These questions organize a conversation; they do not identify a failed component on their own.
In gravure, the engraved cylinder carries the image
Gravure puts recessed, ink-carrying features on the printing cylinder itself. Ink transfers from those recesses to the printing material, while the doctor blade wipes excess ink from the cylinder surface. Daetwyler’s gravure overview also identifies ink, substrate, and viscosity as interacting considerations when selecting a blade.
The distinction is worth learning before comparing two pressrooms. A flexographic anilox and a gravure printing cylinder both have engraved features, but they occupy different positions in the image-transfer process. Calling both simply “the roller” can obscure which surface someone is discussing. Use the component’s proper name when recording a problem, requesting support, or explaining a photograph.
Two blades can have different responsibilities
Many chambered flexographic systems use a metering blade and a containment blade. The metering blade controls the wipe. The containment blade helps retain ink while allowing returning ink to enter the chamber. End seals close its sides. Harper discusses these distinct functions in its guide to chamber and anilox performance.
That distinction matters when identifying a part. “Replace the blade” is incomplete information if the listener does not know which position is meant. A clearer record includes the chamber, the blade’s function, and the approved part specification. Do not assume that a blade suitable for one position is an acceptable substitute in another; verify the configuration with the equipment documentation and supplier.
Why the whole system belongs in the conversation
The blade operates within a larger assembly. Harper’s enclosed-chamber guide connects reliable performance with documented procedures, training, sound components, cleanliness, and alignment. A blade discussion that ignores its holder and chamber leaves out part of the system it must work within.
A useful learning exercise is to draw an empty job record with spaces for the press, ink, printing surface, blade specification, and observed result. Fill it using approved production records or a supervised training exercise. The point is to connect a visible print result to a known setup, rather than memorize a list of isolated component names.
Apex International’s color-strength explanation provides another reminder: anilox volume alone does not determine the printed result. Machine characteristics, ink, plate, substrate, and speed also enter the picture. Treat a single specification as one piece of the process description.
A short vocabulary to keep
- Substrate: the material being printed.
- Anilox: the engraved ink-metering roll used in flexography.
- Doctoring: wiping excess fluid from a surface.
- Metering blade: the blade performing the controlled wipe.
- Containment blade: the blade serving the chamber’s ink-retention role.
Start with the ink path, name the components accurately, and describe what you can actually observe. That foundation makes supplier discussions, training sessions, and later troubleshooting much more useful. The next step is learning how a particular job shapes blade selection, while leaving machine adjustments to the people and procedures responsible for them.
Watch: ink transfer and color strength
Apex International explains factors behind cyan color strength in flexographic printing. This manufacturer presentation adds context to the ink path; it is not a machine setup guide.
Leave a Reply