Print Process Journal

Author: benton67

  • Choosing a Doctor Blade Starts With the Job

    Choosing a Doctor Blade Starts With the Job

    A useful doctor-blade selection conversation starts with a description of the job. Before comparing prices or asking which material lasts longest, establish what the blade must do, what it will contact, and what result the production team needs. Those details give a supplier something meaningful to work with.

    This guide organizes that conversation into a practical brief. It does not nominate a universal winning material or substitute for a press manufacturer’s specification. The aim is to make a proposed change easier to understand, evaluate, and document.

    Define the improvement before choosing the product

    “Better performance” is too broad to test. Write down the specific problem or goal. Perhaps the team wants fewer unplanned interruptions during a recurring job, more consistent appearance over a run, or a clearer replacement schedule. Identify which outcome matters most and which existing qualities must be preserved.

    Then define an acceptance condition with the production and quality teams. A longer run is useful only if the printed output remains acceptable and the equipment is being operated correctly. Agree in advance on who can approve the trial, who will assess the samples, and what would require stopping it. These are planning decisions to settle before a consumable reaches the press.

    Identify the blade’s function and approved dimensions

    Record whether the part is a metering blade or a containment blade, along with the press and chamber identifiers. Product families can be designed for different duties: for example, Allison’s plastic and composite range distinguishes containment products from products intended for particular metering applications.

    Use the approved specification to establish dimensions, edge profile, and installation requirements. Give the supplier the actual part information rather than relying on a description such as “the blue one.” Colors and trade names are not a shared technical language across all manufacturers. If the documentation is incomplete, resolve that uncertainty with the equipment supplier before authorizing a substitution.

    Describe the ink and the surface together

    The ink family, its abrasiveness and chemical compatibility, the roll or cylinder surface, and the required print result belong in the same brief. Allison’s application overview distinguishes economical carbon-steel applications from higher-wear situations involving abrasive inks, and explains that coatings can change blade performance.

    A useful question is: “Which feature of this job makes you recommend this blade?” The answer should connect the proposed material to the application. Ask which assumptions the recommendation relies on, especially when a job has recently changed. A supplier cannot evaluate an ink or operating condition that has been omitted from the description.

    Water-based ink, by itself, is not a complete material specification. Allison’s FAQ notes that stainless steel is not required for every water-based application; the chemistry and operating circumstances matter. Confirm compatibility for the actual ink and cleaning system instead of turning a broad label into a blanket rule.

    Understand what the material categories tell you

    Steel blades include carbon steels, stainless steels, and tool-steel options, with coatings available for some products. Allison’s metal-blade descriptions illustrate how metallurgy, wear resistance, corrosion resistance, and coatings can differ within one broad category. “Steel” is a starting description, not the full specification.

    Plastic and composite options are also diverse. Allison’s plastic and composite guide lists materials intended for different metering or containment conditions. It also cautions that a soft material can embed particles and potentially damage a roll. Avoid assuming that a softer blade automatically removes every wear or damage concern.

    The practical takeaway is to ask for a recommendation at product-and-application level. A material family helps narrow the discussion, but it does not settle compatibility, dimensions, expected performance, or the suitability of a particular edge. Keep those details together in the approved trial specification.

    Consider the edge and the assembly

    Material is only one variable. The working tip and edge profile also influence metering, as Bill Warner explains in Allison’s technical article on blade selection and contact. That is a reason to involve the blade supplier and equipment documentation when selecting a combination.

    A purchasing brief should distinguish the proposed blade change from any other work the machine needs. If a worn holder or an unresolved chamber issue is also being addressed, record it separately. Otherwise, a successful result may be credited entirely to a new blade even though several things changed together. That makes the next purchasing decision harder to defend.
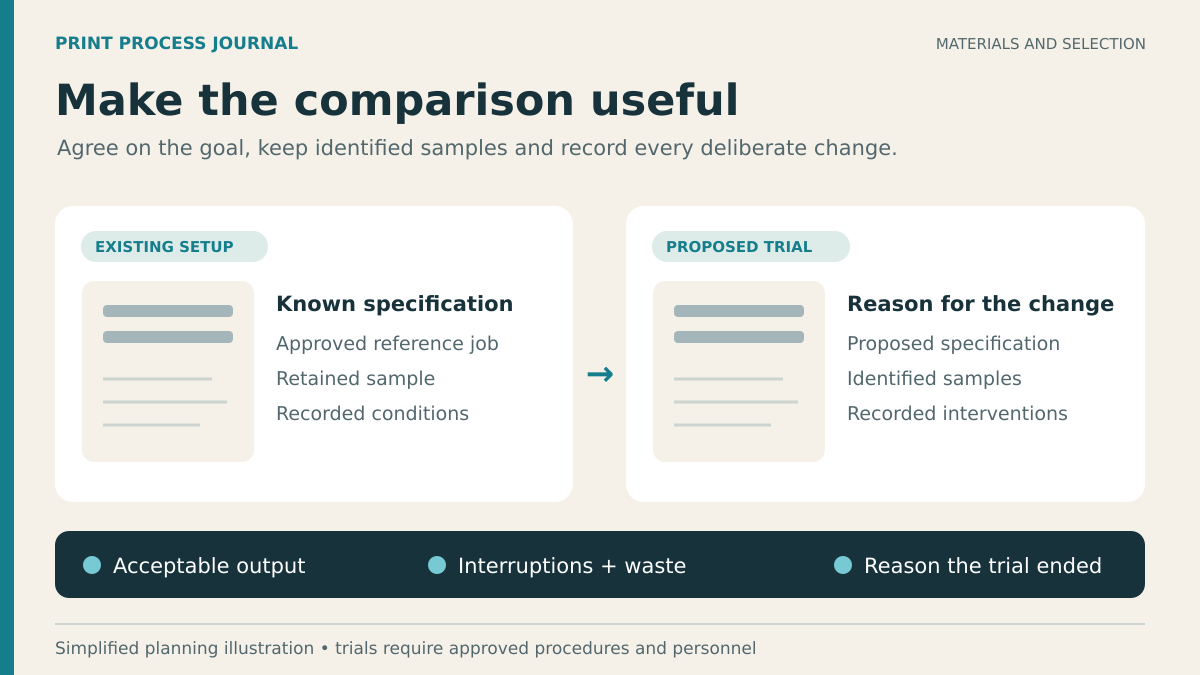
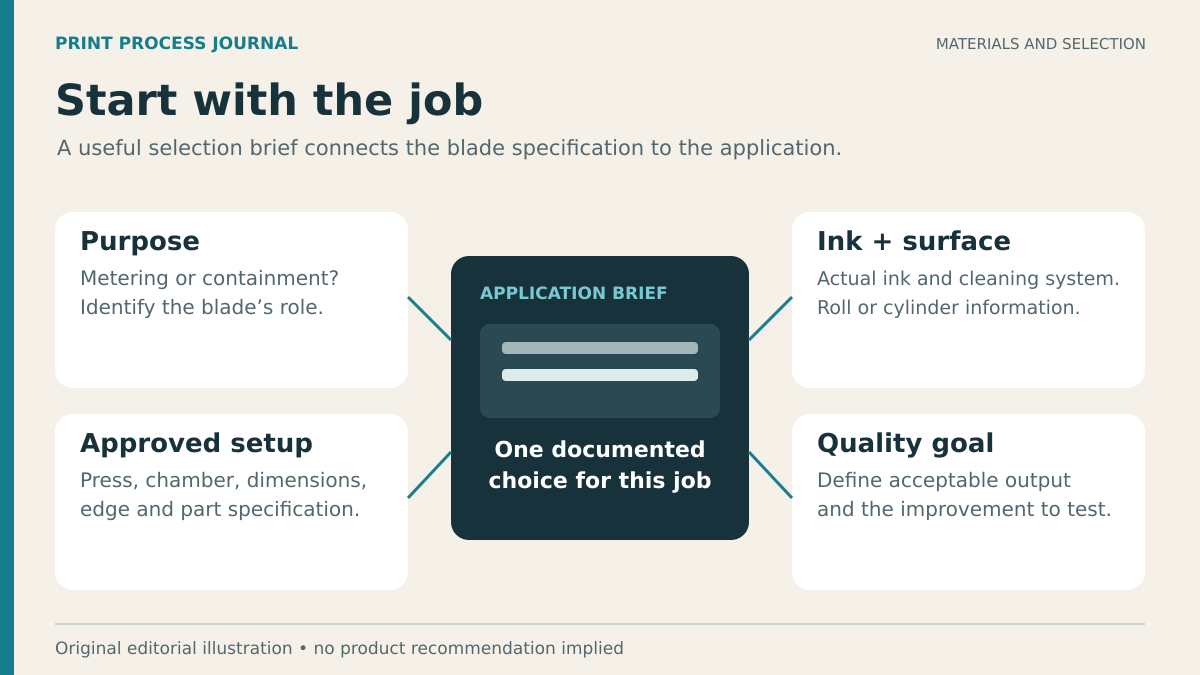
    Existing setup and proposed trial records compared using specifications, identified samples, recorded conditions, acceptable output, interruptions, waste, and the reason the trial ended.
    Original simplified planning illustration. Trials require approved procedures and personnel. Select the image to view it full size.

    Plan a comparison that produces a useful answer

    Use a familiar, approved job as the comparison point where practical. Record the existing setup, the proposed specification, and the reason for testing it. Aim to change one deliberate variable at a time. Where production realities require several changes, list all of them and avoid claiming that the result isolates the blade’s effect.

    • Record the trial’s start and finish, and why it ended.
    • Keep identified print samples using the site’s normal quality procedure.
    • Note interruptions, rejected output, and any approved interventions.
    • Compare the result with the acceptance condition agreed beforehand.
    • Document remaining uncertainty before expanding use.

    Consider the purchase in the context of acceptable output and production time. A low unit price and a long advertised life answer different questions. Neither replaces an application-specific comparison. Avoid importing a supplier’s promotional lifespan claim directly into a budget without checking its stated conditions and obtaining evidence relevant to the job.

    Keep the selection process safe

    Trial planning does not authorize an untrained person to fit blades or adjust equipment. Follow the OEM instructions, the site’s energy-control procedures, and the required handling precautions. Allison’s installation and safety discussion notes that plastic blades can also have sharp edges. Material choice never removes the need for approved handling practices.

    The most useful outcome is a documented choice: this specification, for this application, evaluated against this requirement. It gives purchasing, production, and the supplier a shared explanation of why the blade was selected, and a clear starting point when the job changes.

    Watch: a manufacturer’s blade-selection perspective

    In this Flexo Concepts case study, Mark Andy discusses polymer doctor blades across white-ink, coating, and process-print applications. Performance and service-life statements are the speakers’ claims, not independent comparative findings or a recommendation for every press.

    Watch on YouTube: Mark Andy’s polymer doctor-blade perspective
  • The Small Blade Behind Consistent Print: Doctoring Explained

    The Small Blade Behind Consistent Print: Doctoring Explained

    A doctor blade is a narrow strip with a surprisingly important job: it helps control the ink left on an engraved surface before the next transfer. Understanding that job makes conversations about print quality much clearer. It also explains why a relatively small consumable deserves attention alongside the press, the ink, and the printing surface.

    This introduction follows the ink through flexographic and gravure printing. It is written for readers learning the process, including production newcomers and people who buy printed packaging. It explains the relationships between components; it does not provide machine setup instructions.

    Safety first: Keep observation separate from hands-on work. Only trained, authorized personnel should inspect or service printing equipment, following its manufacturer’s instructions and the site’s safety and energy-control procedures. Unexpected movement and stored energy can cause serious injury, as explained in OSHA’s hazardous-energy overview.

    What the blade actually controls

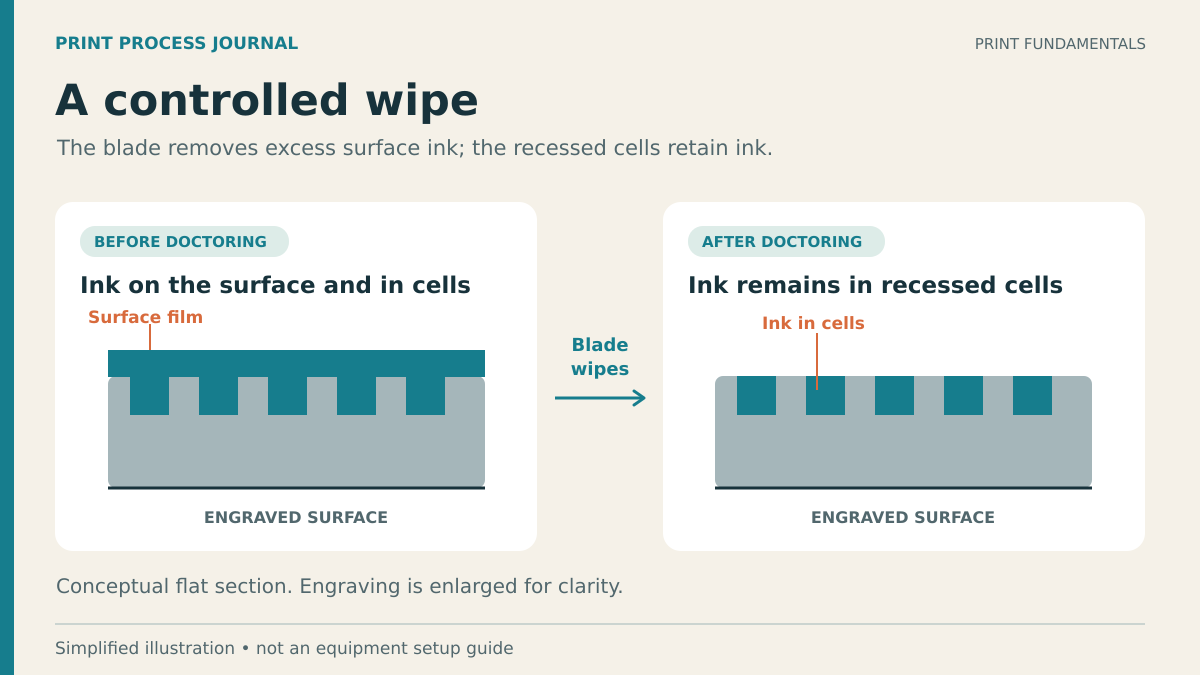
    Imagine an engraved surface after it has received ink. There is ink inside its recessed cells, but also ink on the surrounding surface. The doctor blade removes the excess surface film so the engraved structure can perform its intended metering role. Allison Systems describes this function for both flexographic anilox rolls and gravure cylinders in its doctor-blade overview.

    The important word is consistent. A useful production result is a controlled wipe that remains suitable as the job runs. Thinking only about the first acceptable impression misses the question of what happens later. Does the appearance remain stable? Does a recurring mark emerge? Does the operator need to intervene? Those are questions to record and investigate, rather than reasons to assume that every change originates at the blade.

    Conceptual engraved surface before doctoring with excess surface ink, and after doctoring with ink retained in recessed cells.
    Original conceptual illustration. Engraving is enlarged for clarity; not an equipment setup guide. Select the image to view it full size.

    In flexography, follow the ink to the plate

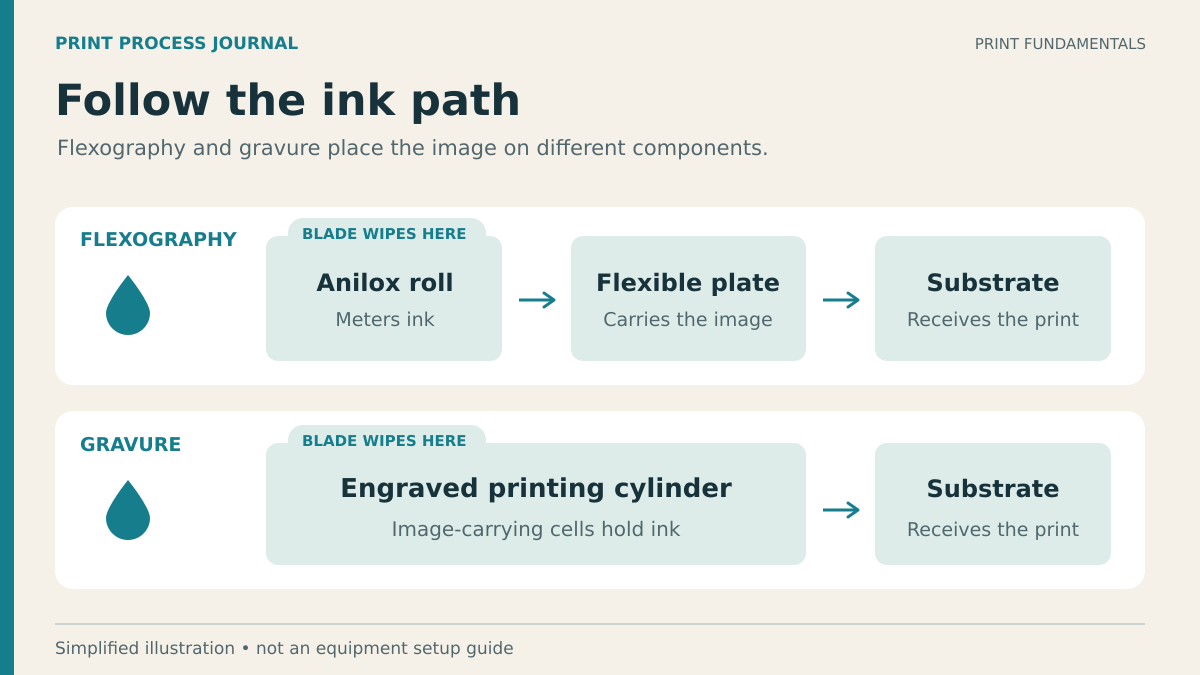
    Flexographic printing uses a flexible printing plate to carry the image. An anilox roll meters ink for transfer to that plate, which then prints the substrate. In a doctor-bladed arrangement, the blade works against the anilox. Daetwyler SwissTec’s flexographic-printing guide emphasizes matching the blade to the anilox and the job, and maintaining a consistent wipe through the blade’s working life.

    For a first explanation, it helps to assign each part one role: the anilox participates in ink delivery, the plate carries the image, and the substrate receives it. The doctor blade belongs in the ink-delivery part of that story. This simple map gives a new reader somewhere to place terms that otherwise arrive as a jumble of unfamiliar machine parts.

    It also helps with questions. If a discussion concerns fine image detail, ask what is happening at the plate and on the printed sample. If it concerns inconsistent ink delivery, ask about the metering system and the recorded operating conditions. These questions organize a conversation; they do not identify a failed component on their own.

    In gravure, the engraved cylinder carries the image

    Gravure puts recessed, ink-carrying features on the printing cylinder itself. Ink transfers from those recesses to the printing material, while the doctor blade wipes excess ink from the cylinder surface. Daetwyler’s gravure overview also identifies ink, substrate, and viscosity as interacting considerations when selecting a blade.

    The distinction is worth learning before comparing two pressrooms. A flexographic anilox and a gravure printing cylinder both have engraved features, but they occupy different positions in the image-transfer process. Calling both simply “the roller” can obscure which surface someone is discussing. Use the component’s proper name when recording a problem, requesting support, or explaining a photograph.

    Two blades can have different responsibilities

    Many chambered flexographic systems use a metering blade and a containment blade. The metering blade controls the wipe. The containment blade helps retain ink while allowing returning ink to enter the chamber. End seals close its sides. Harper discusses these distinct functions in its guide to chamber and anilox performance.

    That distinction matters when identifying a part. “Replace the blade” is incomplete information if the listener does not know which position is meant. A clearer record includes the chamber, the blade’s function, and the approved part specification. Do not assume that a blade suitable for one position is an acceptable substitute in another; verify the configuration with the equipment documentation and supplier.

    Why the whole system belongs in the conversation

    The blade operates within a larger assembly. Harper’s enclosed-chamber guide connects reliable performance with documented procedures, training, sound components, cleanliness, and alignment. A blade discussion that ignores its holder and chamber leaves out part of the system it must work within.

    A useful learning exercise is to draw an empty job record with spaces for the press, ink, printing surface, blade specification, and observed result. Fill it using approved production records or a supervised training exercise. The point is to connect a visible print result to a known setup, rather than memorize a list of isolated component names.

    Apex International’s color-strength explanation provides another reminder: anilox volume alone does not determine the printed result. Machine characteristics, ink, plate, substrate, and speed also enter the picture. Treat a single specification as one piece of the process description.

    A short vocabulary to keep

    • Substrate: the material being printed.
    • Anilox: the engraved ink-metering roll used in flexography.
    • Doctoring: wiping excess fluid from a surface.
    • Metering blade: the blade performing the controlled wipe.
    • Containment blade: the blade serving the chamber’s ink-retention role.

    Start with the ink path, name the components accurately, and describe what you can actually observe. That foundation makes supplier discussions, training sessions, and later troubleshooting much more useful. The next step is learning how a particular job shapes blade selection, while leaving machine adjustments to the people and procedures responsible for them.

    Watch: ink transfer and color strength

    Apex International explains factors behind cyan color strength in flexographic printing. This manufacturer presentation adds context to the ink path; it is not a machine setup guide.

    Watch on YouTube: Apex Color Strength – Cyan Video

  • Before You Turn Up the Pressure: A Better Print-Defect Log

    Before You Turn Up the Pressure: A Better Print-Defect Log

    A streak appears in a printed sample. Someone suspects the blade, someone else suspects the ink, and the next proposed adjustment is already being discussed. Before the explanations become competing certainties, capture what happened. A concise defect log helps the production team separate an observed symptom from a possible cause.

    The purpose is to support the site’s approved troubleshooting process. A log cannot diagnose equipment by itself, and this article does not prescribe pressure settings, cleaning chemistry, or mechanical adjustments. It gives the people responsible for those decisions a clearer record to work from.

    Make the situation safe before investigating

    Use the site’s response procedure when a defect, leak, or suspected equipment problem appears. Only authorized personnel should inspect or service the machine, following the OEM instructions and applicable energy-control procedures. OSHA explains that unexpected startup or released stored energy can injure people during maintenance. A stopped machine is not, by itself, proof that every hazard has been controlled.

    Gather information from approved controls, production records, and safely obtained samples. Do not reach toward a moving roll, bypass a guard, or handle a blade to collect evidence. If the proposed observation cannot be made safely within the site’s procedure, leave it for the qualified person responsible.

    Write the symptom before the explanation

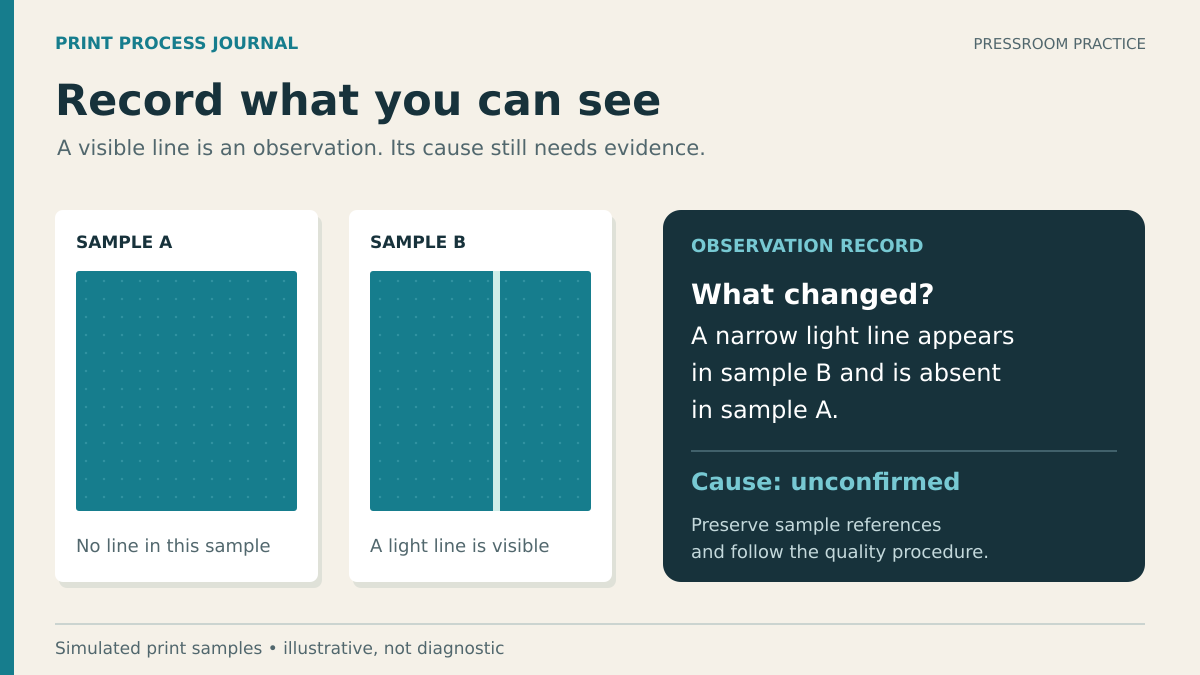
    “Blade failure” is a conclusion. “A narrow light line is visible at the same cross-web position in the retained samples” is an observation. The second statement gives another person something to inspect without requiring them to accept a diagnosis first.

    Harper’s anilox-scoring guide provides a useful example: a light line can be associated with scoring, but plugged cells can also produce a light streak. Similar appearances can have different explanations. Preserve that uncertainty in the record until an appropriate inspection establishes more.

    Describe the affected color or station, where the mark appears, whether it is continuous or intermittent, and when it was first noticed. Use the same reference edge or coordinate convention the production team normally uses. If a detail is unknown, mark it unknown rather than estimating it from memory.

    Create a timeline of the job

    A result becomes easier to interpret when it is connected to time. Record whether the problem was present at startup, emerged during the run, or followed a known event. List recent changes without treating the most recent one as automatically responsible.

    Allison’s blade-analysis form asks about press speed, the ink or coating, cylinder type, blade materials, operating time, when the issue developed, and recent process changes. Those categories are a useful starting point for a local record. Include measurement units and identifiers so someone outside the shift can understand the entries.

    Keep the timeline short enough to maintain during a real production day. A few dated observations are more useful than a long retrospective story that merges several events. Where a control setting is available in the press record, reference that record instead of retyping an uncertain number.

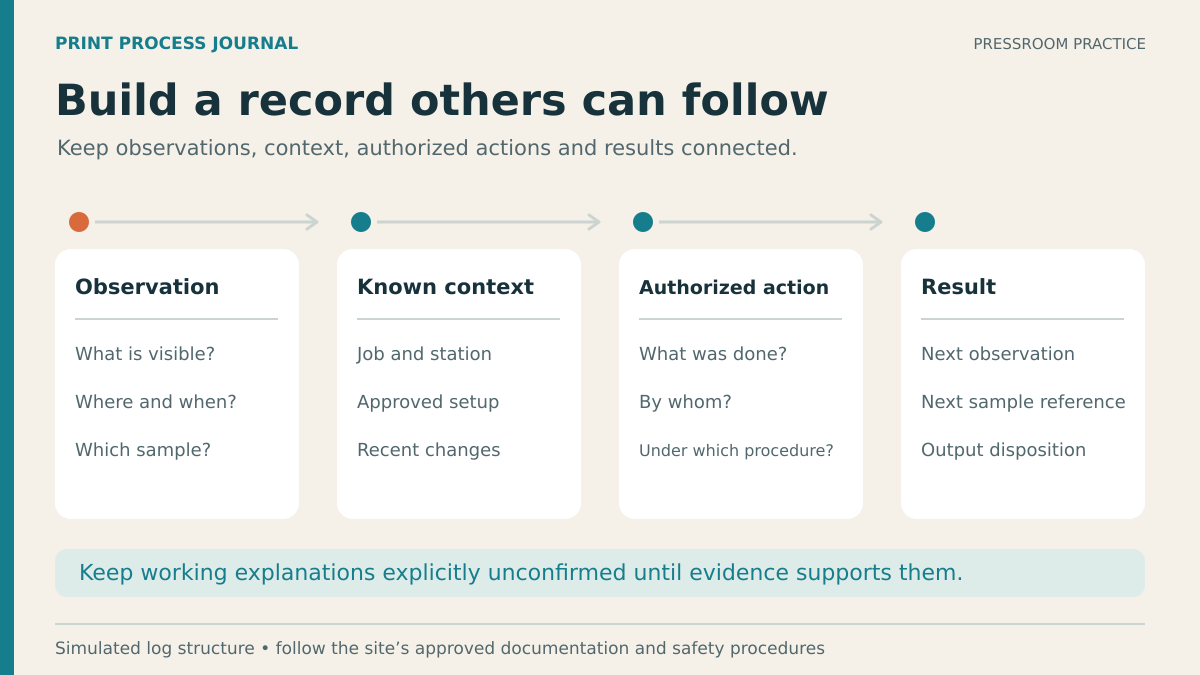
    Observation log diagram linking what is visible, known job context, authorized action, and the next observed result, while keeping possible causes unconfirmed.
    Original simulated log structure. Follow the site’s approved documentation and safety procedures. Select the image to view it full size.

    Use an observation-and-action record

    The following fields can be added to an existing job sheet or quality record. They are an editorial organizing tool, not a replacement for the site’s approved documentation.

    1. Identification: job, press, station, sample reference, date, and time.
    2. Observation: what is visible, where it appears, and how often it occurs.
    3. Known context: approved setup, current materials, and relevant recent changes.
    4. Working explanation: the possibility being investigated, clearly marked as unconfirmed.
    5. Authorized action: what was done, by whom, and under which procedure.
    6. Result: the next observation, sample reference, and disposition of affected output.

    A hypothetical entry might read: “Light line first seen in sample B, station three; absent in sample A. Cause unconfirmed. Production lead notified; affected output handled through the quality procedure.” It is intentionally restrained. It records evidence and the immediate response without pretending the component-level cause is already known.

    Keep pressure changes in context

    Increasing pressure may feel like a direct response to an imperfect wipe or leak. Harper’s scoring guide describes how excessive blade loading can change the wear pattern and generate larger metal slivers that threaten the anilox surface. That makes pressure a controlled setup variable, not a general-purpose remedy.

    Harper’s discussion of anilox and chamber performance also connects reliable operation with alignment, end-seal condition, and maintenance, and advises beginning with OEM-recommended settings. If a chamber is leaking, record where and when the leak occurs, then let the authorized team investigate the assembly under its established procedure.

    There is no useful universal pressure number to insert into this log. Record the approved setting or reference document and any authorized change. Include the reason for that change and the observed result. This preserves the difference between a deliberate test and an undocumented adjustment.

    Preserve evidence for the people who can use it

    Keep sample labels consistent with the job record. If a removed blade or other component may need specialist analysis, ask the supplier how to preserve and package it safely. Allison warns in its analysis instructions that cleaning a worn blade can alter features needed for evaluation. Follow the supplier’s guidance and the site’s handling rules; do not improvise sample preparation.

    When contacting technical support, send the concise timeline, relevant specifications, and identified samples or images through an approved channel. Separate confirmed facts from suspected causes. State the question you want answered, such as whether the wear evidence supports a particular explanation, rather than asking the supplier to infer the entire production history.

    Close the record with an outcome

    After the authorized team resolves or contains the problem, record what was established, what changed, and what remains uncertain. If several actions occurred together, say so. Note any follow-up assigned through the site’s maintenance or quality process.

    A good defect log makes the next conversation shorter and more precise. It preserves the observations that would otherwise disappear between shifts, supports careful decisions, and helps a recurring problem be recognized without turning yesterday’s assumption into today’s accepted fact.

    Related equipment demonstration

    TRESU demonstrates its E-Line chamber doctor-blade holder and blade exchange. This vendor-specific example helps identify the assembly being discussed in a job record. It is not a diagnostic guide or a substitute for your equipment’s instructions, training, or energy-control procedure.

    Watch on YouTube: TRESU E-Line chamber doctor-blade demonstration